

Introducing Netduino.Foundation

Hey folks! Bryan Costanich here, cofounder of Wilderness Labs and I’m really excited to announce the biggest step forward for Netduino since it was created: Netduino.Foundation!
Netduino.Foundation is an open source framework that greatly simplifies creating connected things using the .NET MicroFramework. At its heart, Netduino.Foundation is a massive library of drivers for common peripherals such as sensors, LCD screens, servos, and more; all available via Nuget, that take the hardware headache out of hardware hacking. But it’s much more than that. It’s handcrafted API that really aims to make hardware development elegant and enjoyable.
PWM LED Animation Example
For example, let’s examine animating LEDs using Pulse-Width-Modulation (PWM) signals. LEDs are usually tricky to work with; they have a maximum voltage rating and if you supply them more voltage than they’re rated for, they’ll quickly burn up. For this reason, they need to be power-limited either by using a resistor, or via a PWM signal. A PWM signal is a modulated output in which the voltage is switched on and off at a high frequency and described by a duty cycle, which defines what percentage of the time the signal is on; so for instance, a 75% duty cycle means that the voltage is on 75% of the time. Because of the nature of electricity and circuits, a fast PWM signal has the same effect of simply lowering the voltage. So a digital output capable of delivering a 3.3V signal that’s using PWM to modulate its output at a duty cycle of 75% would actually be outputting ~2.5V (3.3 * .75) on average.
PWM is a versatile technique for controlling all sorts of things (servos and other motors use it), but it’s super useful for limiting voltage to LEDs. Before Netduino.Foundation, generating a PWM signal to power an LED meant creating a new PWM object, calculating the duty cycle, starting the PWM generator, and managing its lifecycle on a background thread. If you wanted to animate the LED with something like a pulse visualization, in which you gradually bring the LED up to full power and then lower it again to make a smooth pulsing effect, even more code and calculations would be required.
Using Netduino.Foundation, you can create a really nice pulse animation on an LED using the following code:
 // create a new LED on pin 11
 var pwmLed = new LEDs.PwmLed(N.PWMChannels.PWM_PIN_D11,
    LEDs.TypicalForwardVoltage.Green);

 // pulse the LED
 pwmLed.StartPulse();
In this case, we’re using a green LED plugged into pin 11 and we pass the voltage necessary to drive a green LED (which conveniently can be found in the TypicalForwardVoltage class) to the constructor, and then we call StartPulse to begin the pulse animation.
Here’s an illustration of the circuit to run this animation:
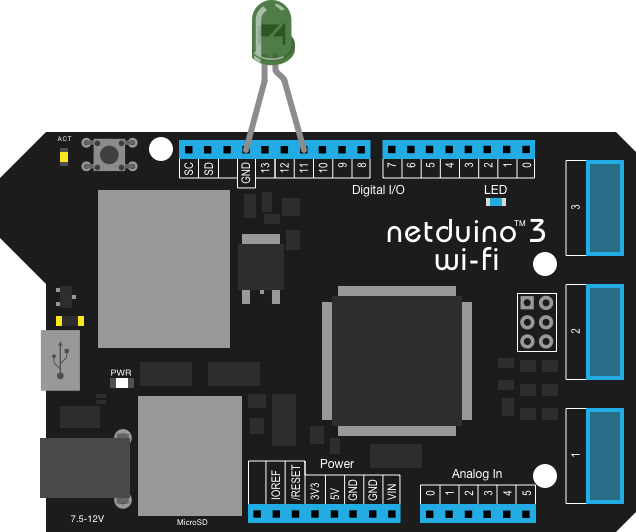
Netduino.Foundation hides all the complexity needed to do accomplish this task. We automatically calculate the maximum duty cycle that the LED can use, calculate the values needed to perform the animation, spin up a new thread, and begin a loop that automatically controls the PWM output to make a nice animation. And all you have to do is instantiate a new PwmLed object and call the Pulse method!
RGB PWM LED
Animating an RGB LED, in which the LED is actually comprised of three primary color component LEDs of red, green, and blue, is just as easy, but even more powerful because we have a modern Color structure to define the color output. Just like before, simply instantiate a new RgbPwmLed with the appropriate pins and voltage limits, call StartPulse, pass a color, and Netduino.Foundation does all the hard work for you:
 var rgbPwmLed = new LEDs.RgbPwmLed(N.PWMChannels.PWM_PIN_D9,
    N.PWMChannels.PWM_PIN_D10, N.PWMChannels.PWM_PIN_D11,
    2.1F, 3.0F, 3.0F);

 rgbPwmLed.StartPulse(Color.Orange);
In this case we passed a named color, but you can create a color from a hex string such as “#23ABE3”, RGB values, or HSB values!
Wanna loop through the complete rainbow of colors? Easy, loop through the hue spectrum and specify the color using HSB values:
 // loop through the entire hue spectrum (360 degrees)
 for (int i = 0; i < 360; i++)
 {
    var hue = ((double)i / 360F);

    // set the color of the RGB
    rgbPwmLed.SetColor(Color.FromHsba(((double) i/360F), 1, 1));

    Thread.Sleep(18);
 }
API Documentation
There’s a lot more you can do with an RGB LED, too. Check out the awesome API documentation for that particular component here. In fact, the whole Netduino.Foundation library is documented. Checkout the complete core API documentation here.
Huge Peripheral Library
One of the best things about Netduino.Foundation is the already massive peripheral driver library that’s expanding daily. Each peripheral is well-documented, includes sample applications, diagrams of the required circuit, and component sourcing information.
Working with Sensors
We’ve taken the same care with the whole library of peripherals as seen in the examples above. The sensor API, for example, hides much of the complexity of polling and reading sensor values, and exposes them via an elegant, and modern and energy efficient API.
Netduino.Foundation exposes sensor readings via both a traditional low-level polling API, in which readings are manually triggered via an Update() method, and a high-level event/notification architecture, in which the polling is automatic and updates are surfaced via events, and only surfaced when there value changes enough to be interesting.
Consider the following example, which listens for temperature changes from an HIH6130 combined temperature and humidity sensor:
 using Microsoft.SPOT;
 using Netduino.Foundation.Sensors.Atmospheric;
 using System.Threading;

 namespace HIH6130InterruptSample
 {
     public class Program
     {
         public static void Main()
         {
             //  Create a new HIH6130 and set the temperature change
             // threshold to half a degree.
             var hih6130 = new HIH6130(
             temperatureChangeNotificationThreshold: 0.5F);

             //  Hook up the interrupt handler.
             hih6130.TemperatureChanged += (s, e) =>
             {
                 Debug.Print("Temperature changed: " +
                 e.CurrentValue.ToString());
             };

             Thread.Sleep(Timeout.Infinite);
         }
     }
 }
In this example, the temperatureChangeNotificationThreshold value is set to half a degree celsius, which tells Netduino.Foundation to only notify the application when the value has changed by that much. It then raises an event when that happens, and we can handle it as we would any other event, rather than having to spin up our own thread to continuously poll and monitor the sensor.
And there’s much more to the sensor API that’s really great. You can optionally specify the polling interval. For instance, if you’re building a connected weather station that runs off of a solar panel, you might want to dial readings down to every 30 minutes. With the sensor API you can do that, and then your application can go to sleep until it gets a new reading, waking up only to do the required work, and then back to sleep, using only a tiny amount of power!
Hardware Protocol Implementation
We’ve also simplified access to peripherals using various protocols such as I2C and SPI by creating base class implementations that handle all the low-level plumbing for you! For instance, if you need to create a new peripheral driver for an I2C device, simply use the I2CBus object, tell it your peripheral’s I2C address, and it’ll handle all the hard work for you!
Open Source
And one of the best things about Netduino.Foundation is that it’s completely open source! Having the source code at hand means that you see how Netduino.Foundation works to copy patterns and code into your own projects, or even allow you to fix a bug, or add support for a new peripheral and send us a pull-request!
Get Started Today
Give Netduino.Foundation a go today! Take a look at the getting started documentation, buy a netduino, and join the community! We can’t wait to see what you build. 🙂